We have added a number of functions to improve usability, based on the requests we have received from customers.
You can now download the magic number and license files from Asprova and NLS / DS utilities.
The annual rewriting procedure for e-Protector is no longer required.
An optional replacement service has been added to the maintenance contract service.
1. Wrap text and inserting new lines
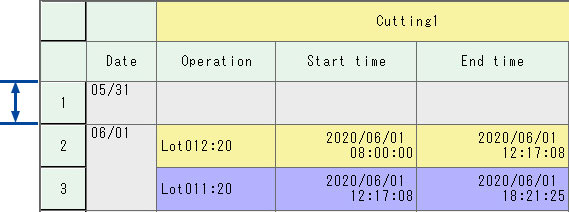
It is now possible to insert new lines, as well as wrap text in the tables and Dispatching view.
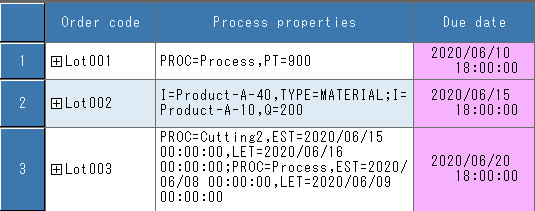
In the previous version, long strings were cut off in the cell of table windows, because they could only be displayed in one cell. From now onwards, it is possible to wrap the text in the cell. (Figure on the right shows process properties and due date columns)
You can also enter a line break with Alt + Enter key if it is a string type property. Import and export are possible even if it contains line breaks. It is also possible to delete the line breaks and export the table by changing the settings.
In addition, you can now specify the line break position of the property name displayed in the header row of the table window.
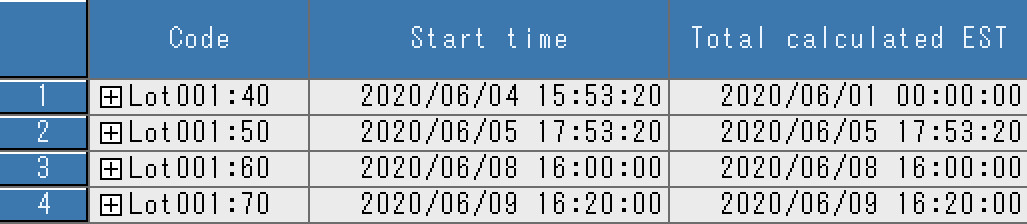
The header for [Total calculated EST] column does not look very nice.
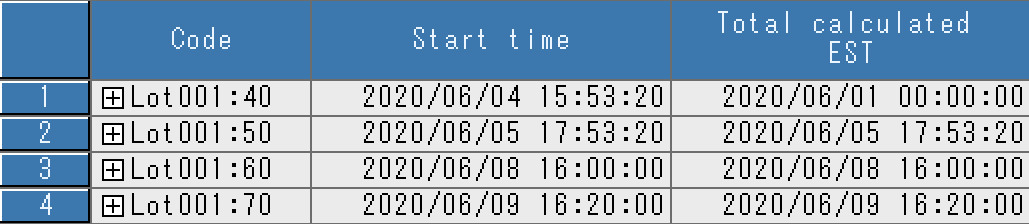
Select “Edit Header Column” from right-click menu. The header column will be in edit mode. Use ALT + Enter to start a new line.
Exit the edit mode and it will be displayed nicely.
The table window is seen most often during operation, so these improvements will make tables easier to see, improving work efficiency.
Wrap test will also be possible in the dispatching view. Along with this, the height of rows can be changed in the dispatching view.
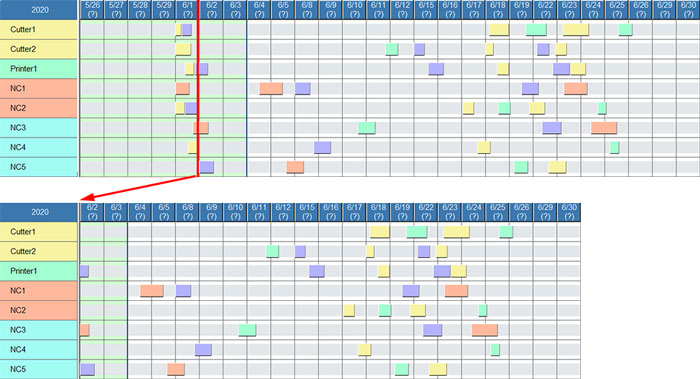
2. Dispatching view
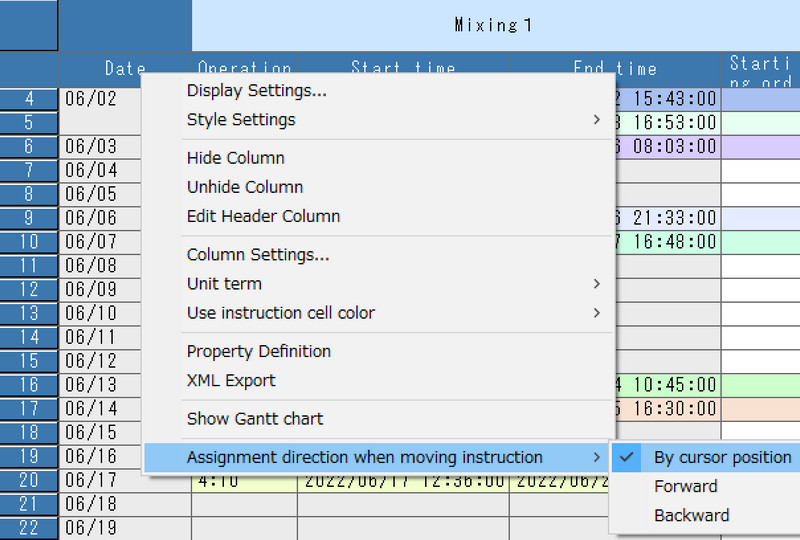
The assignment direction can now be fixed.
In the previous version, moving the operation in the dispatching view was possible by selecting the assignment direction while dragging.
In response to the customer’s request that the assignment direction should always be fixed forward, we have made it possible to select from the following three methods depending on the style.
Select forward or backward while dragging.
Assign forwards from the start time of the operation.
Assign backwards from the end time of the operation.
If you specify 1, it will be the same as the previous version.
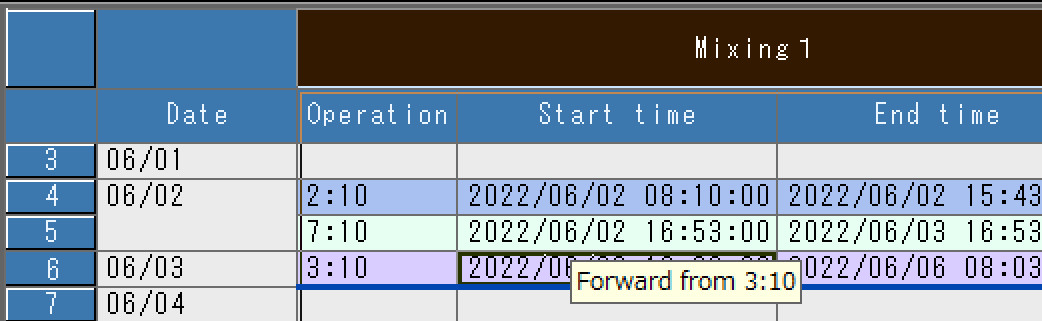
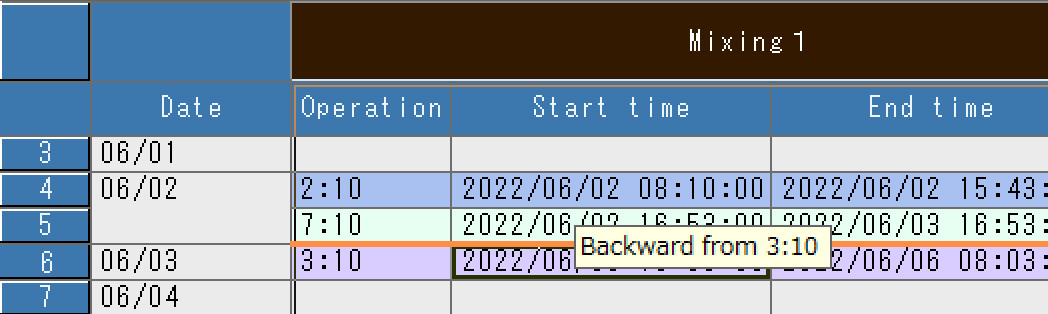
The assignment direction during dragging is now easier to understand.
The assignment direction can be identified by the cursor or color of underline while dragging the operation.
In the figure below, operation 4:10 is forward assigned from end time of operation 3:10 on the left, and backwards assigned from the start time of operation 3:10 on the right.
3. Search dialog
You can now specify an easier way to search by using item codes, customer codes, etc.
In the search dialog on the table window or chart window, you can now search items, customers, specs and other objects by codes in the search field.
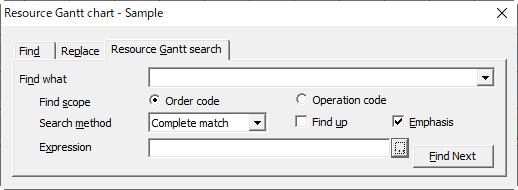
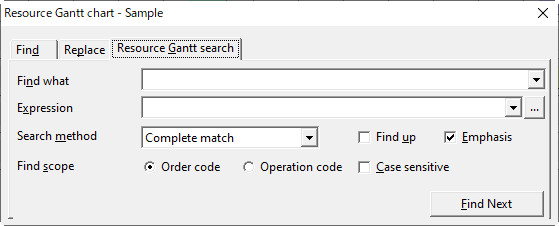
In the previous version, you have to write an expression with the string to search for example, an object’s code. From this version onwards, if the expression uses the keyword INPUT, it is replaced with the string from the search field when you search.
Previous version
Ver.16
You can now choose whether or not to make it case-sensitive.
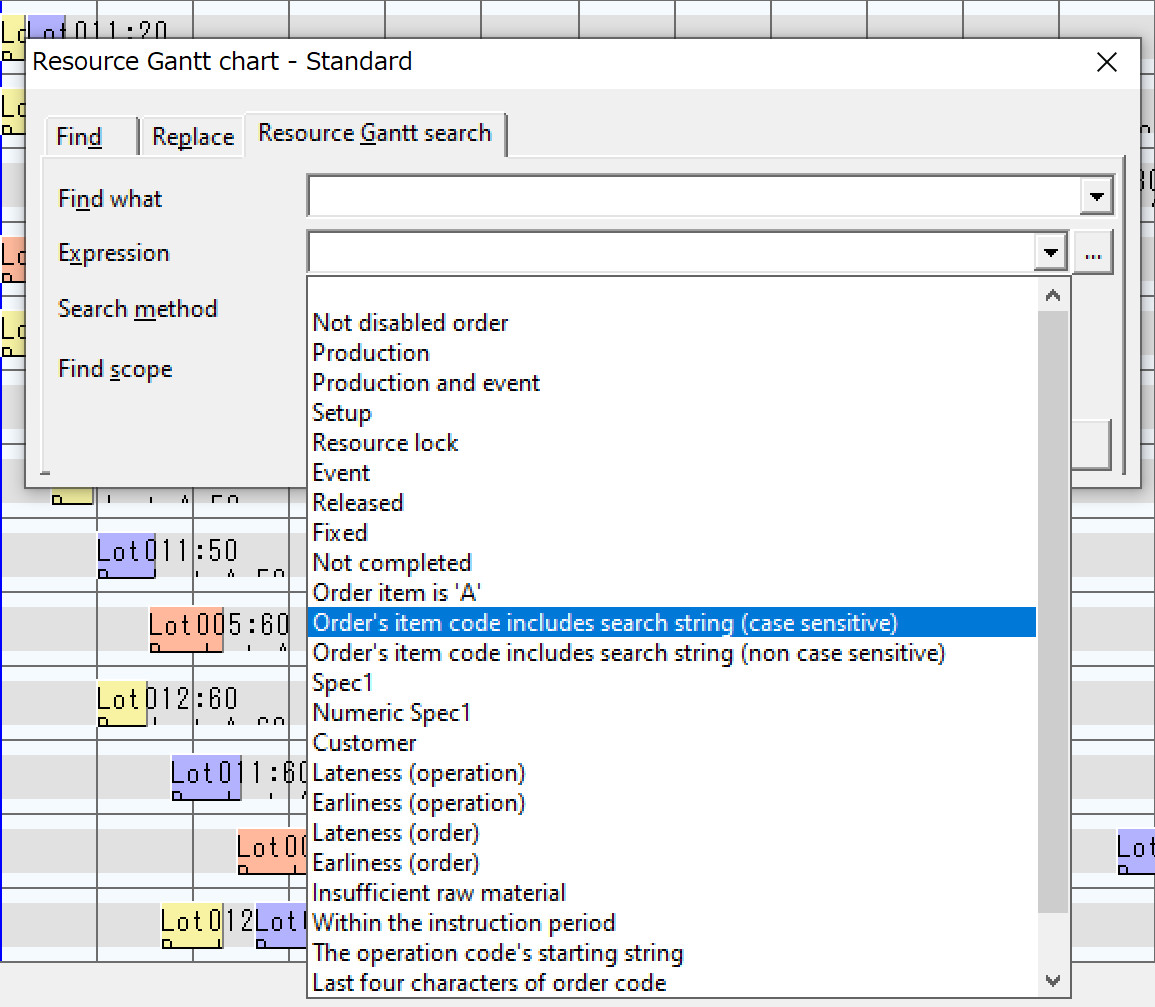
Selection of search expression
In “Expression”, you can select the expression from the combo box.
Switch tabs with shortcut keys
You can now toggle through the three tabs of search, replace, and Resource Gantt search by using shortcut keys.
4. Other user interfaces
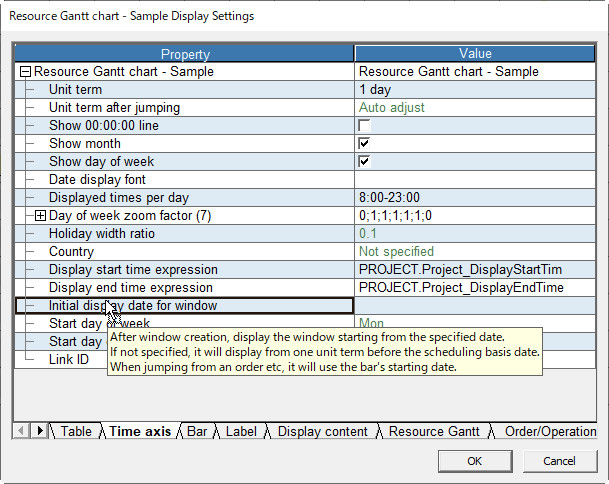
You can now specify the display start time for each style when launching a window.
It is now possible to specify the displayed start time for each style when launching a chart/window.
After launch
Because this property is an expression type, you can specify a relative date and time, for example assignment start time – 1d.
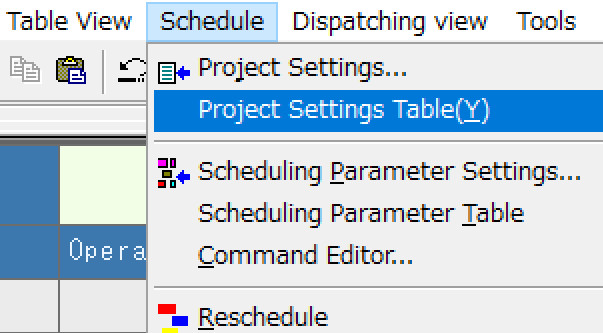
Project table
A menu to display projects (also called project settings) in a table has been added. This makes it easier to create your own preferred project table styles and add properties to your project classes.
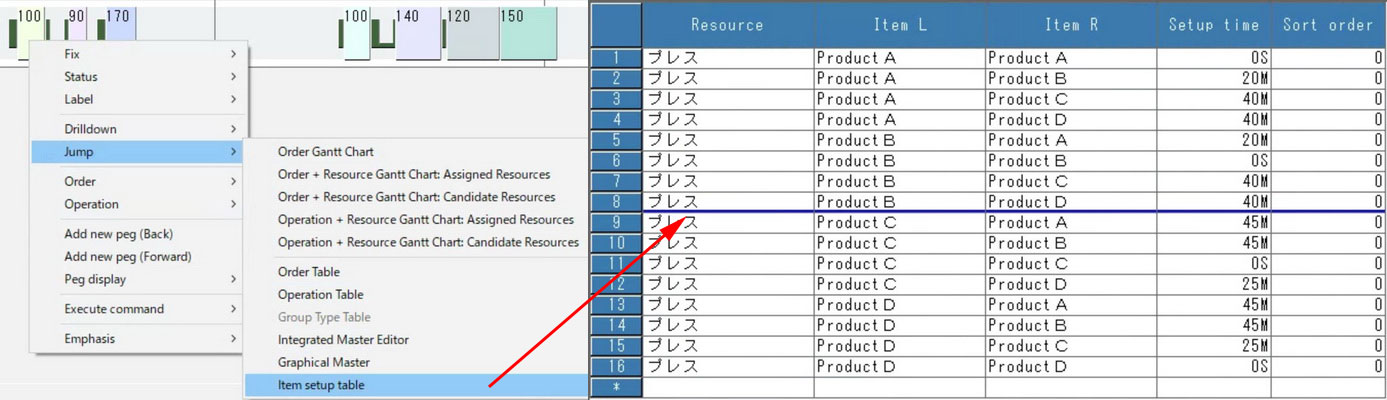
Jump from operation to changeover setup table.
It is now possible to jump to the corresponding changeover setup table from the right-click popup menu of an operation or operation’s use instruction. Since only the changeover setup table is displayed in the pop-up menu, it is easy to understand which table caused the changeover setup.
5. Calendar
You can now specify the start and end time.
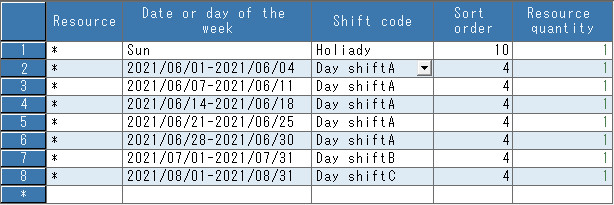
You can now specify the start and end time of each calendar object in the calendar table. This makes it easier to create a calendar for each period than using “Sort order”.
For example, if the shifts are decided every month, the settings in the previous version are shown in the top right figure. However, from Ver.16, it is possible to set it as shown in the bottom right figure by using the start and end date.
6. Other new features and improvements
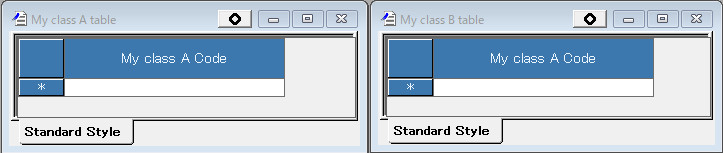
The alias of code properties can be set for each user class.
In the case of code properties of user-added tables, property definitions can be created for each table. In the previous version, there was only one property definition, so changing the alias of code properties, would change the caption of code properties for all user-added classes. However, from Ver.16, you can set aliases for each class seperately.
Previous version. Properties of same definitions could not have different alias.
Ver.16
Sleep command
Added a command to stop process at specified time. This allows you, for example, specify a sufficient amount of time and wait, when you are exporting something to the database and waiting for a process you do not know the end of. During execution, a countdown in seconds will be displayed in the status bar.
Internal function
The following internal functions have been added.
Lower (string) Returns the string given by the argument in lower case.
Upper (string) Returns the string given by the argument in uppercase.
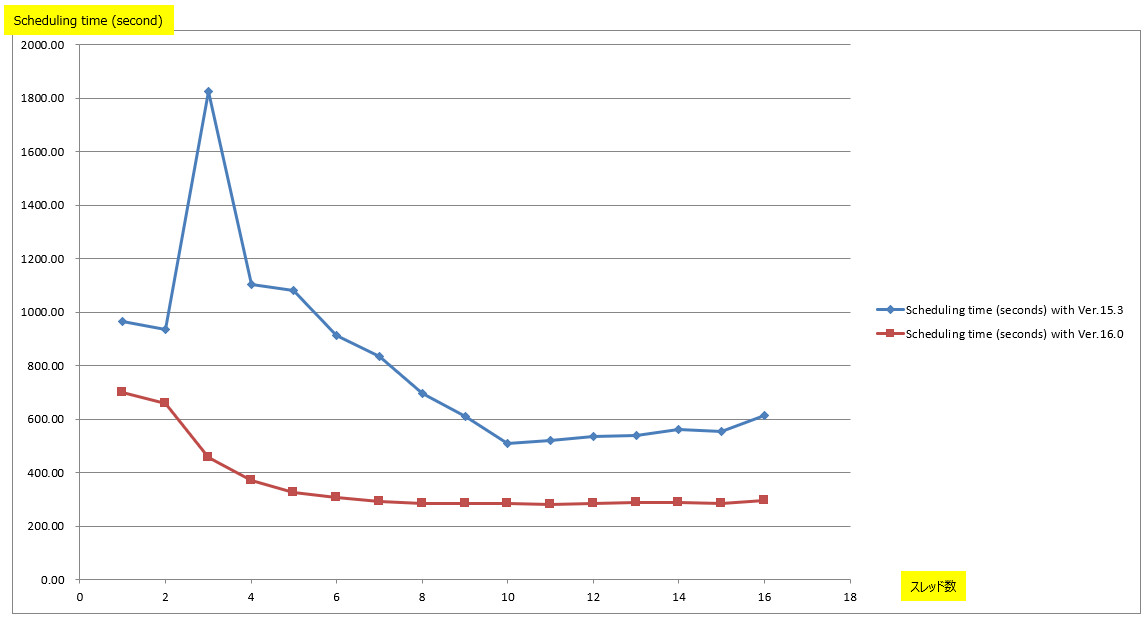
7. Increased processing speed
1. Speeded up the basic processing of obtaining, adding, modifying, and deleting properties. This will result in faster overall processing.
Below is the result of the reschedule time for our test data. The speed has been improved by a maximum of about 30%.
Reschedule time (seconds)
Data
Number of operations
Number of orders
Number of items
Number of resources
Ver.15.3
Ver.16.0
Shortened time (seconds)
Reduction rate (%)
Test data 1
10000
200
10
250
5.12
4.17
0.94
81.56%
Test data 2
100000
100000
10
10
9.82
9.48
0.34
96.54%
Test data 3
100000
20000
100
25
34.46
27.01
7.45
78.39%
User data 1
33922
10798
68371
75
8.89
6.47
2.42
72.76%
User data 2
1768
406
189580
231
27.41
23.10
4.31
84.28%
User data 3
104731
26196
180253
306
53.47
37.99
15.48
71.04%
User data 4
210.34
117.71
92.64
55.96%
User data 5
213401
7852
32192
822
292.67
232.88
59.80
79.57%
2. Prevented unnecessary broadcasts during rescheduling.
3. Speeded up the assigning process using COMASLAssigner class of COM I/F.
4. Fixed a problem where a small number of threads could slow down the processing when using the multi-thread function.
The contents above are not guaranteed to be speeded up under all conditions because it depends on the data and processing to be executed, but it should be speeded up for most cases.
8. Other improvements
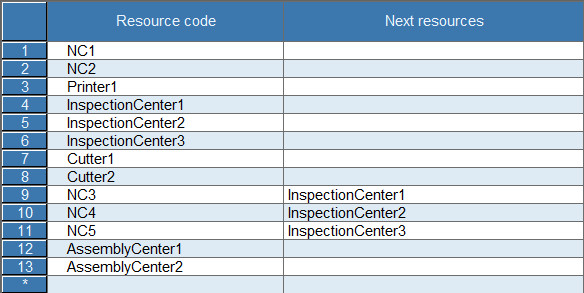
Sample data are easier to see
Only relevant properties are now shown in the samples, making it easier to understand.
The figure on the right is the resource table of sample K for learning the next resource constraint feature.
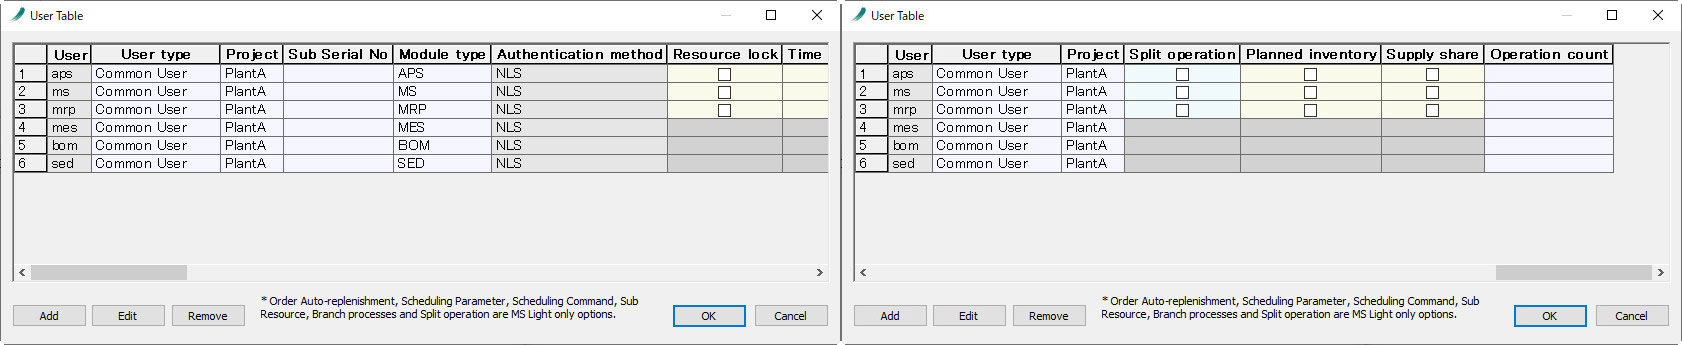
The columns of the user table have been fixed. This makes it easier to refer to the users of the settings when scrolling to the right.
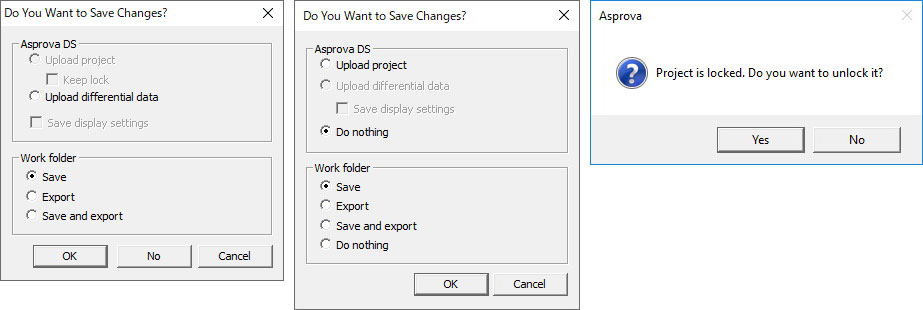
When using Asprova DS, you can exit Asprova with the project locked.
In the previous version, Asprova couldn’t be closed with the project locked. Now, that is possible.
9. License renewal procedure
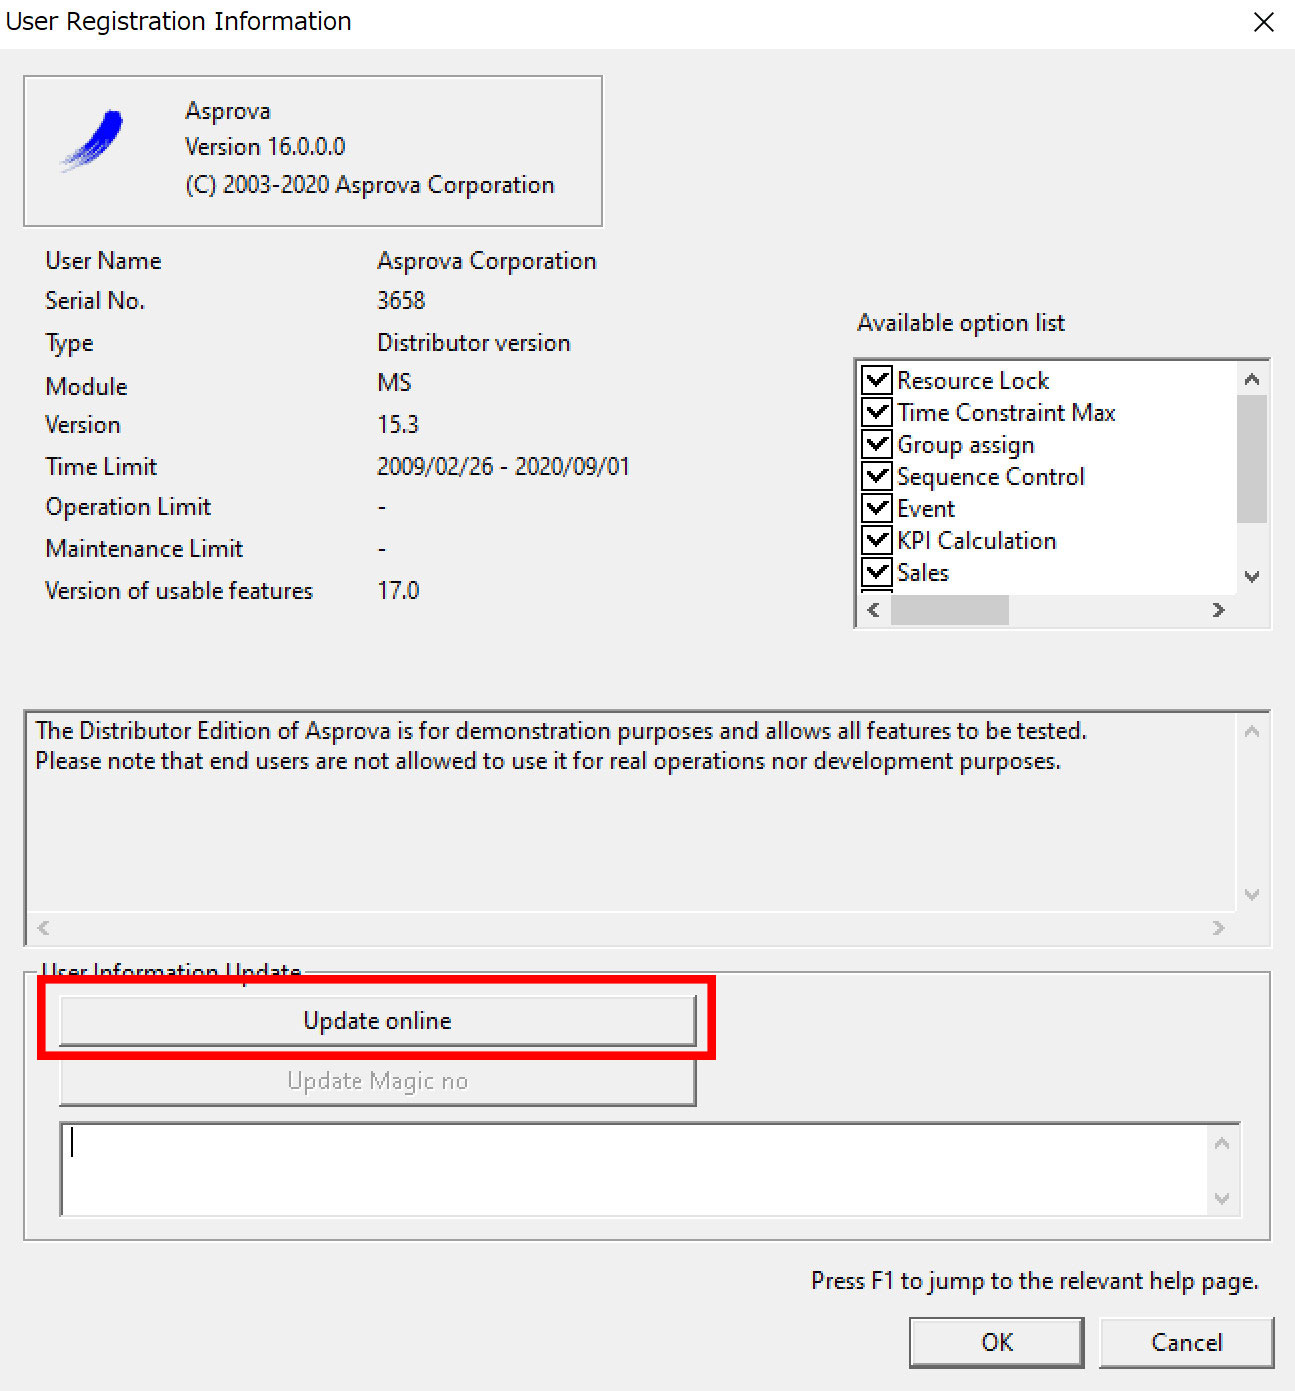
You can now download the Magic No and license files of the purchased license.
You can now rewrite the protector information when you update the maintenance contract with a single button. It is no longer necessary to manually enter the magic No sent by email as before. (However, it is required that your Asprova, Asprova NLS, and Asprova DS are in an environment that can connect to our web server. )
Similarly, you can initialize the backup protector with a single button.
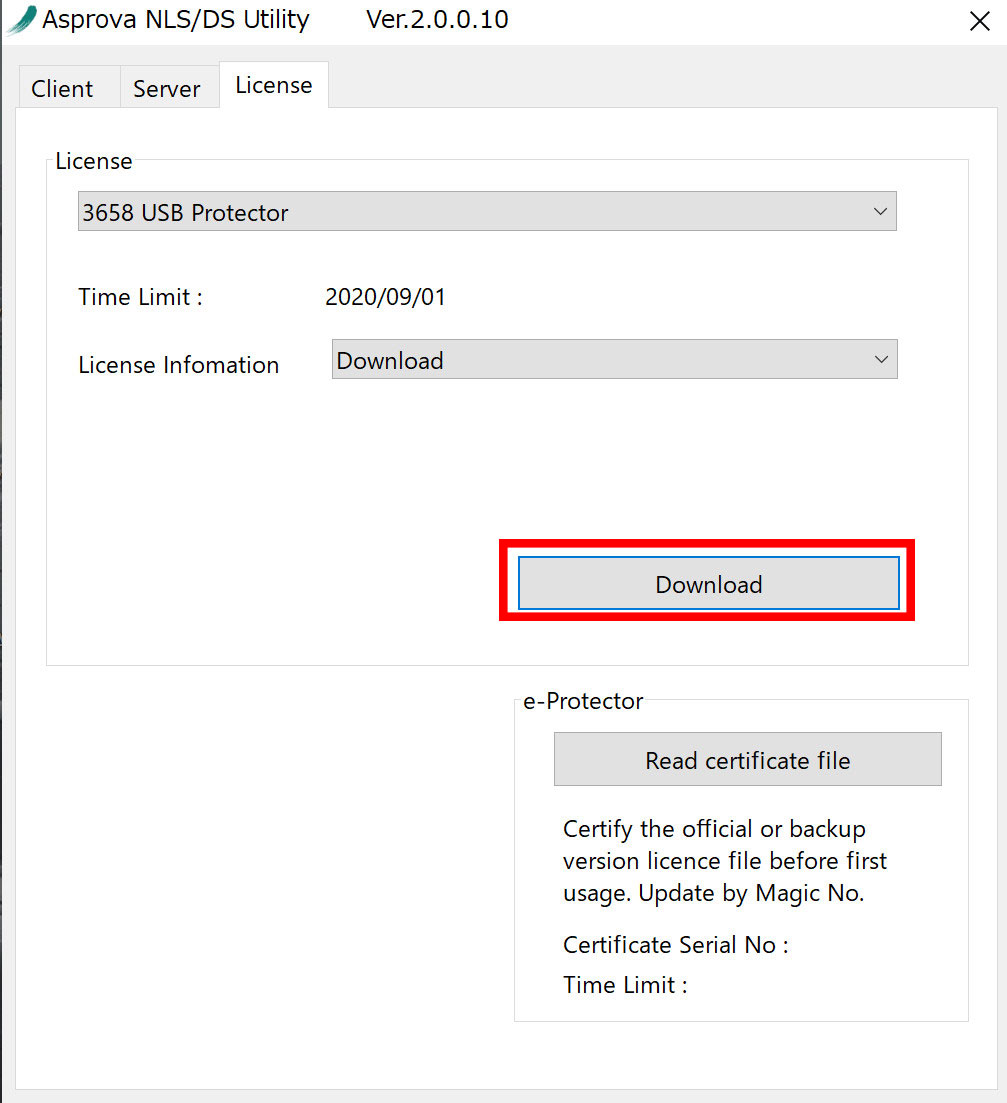
Asprova NLS and Asprova DS can similarly renew your license with a single button from Asprova NLS/DS Utility Ver. 2.0.0.10.
If you have an earlier version of Asprova or Asprova NLS, you can download it from the HP.
Until now, the magic No. and new license file, which are required to rewrite protector information at renewal of maintenance contract, were mainly sent by e-mail, now they can be downloaded from our homepage.
Until now, users using e-Protector had to enter the magic number every year to extend its’ expiration date. Otherwise, the supply of Asprova NLS license stopped and users could not use Asprova thereafter.
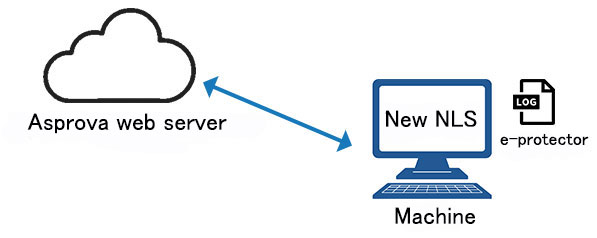
From Asprova NLS Ver.2.0.0.10, these steps are unnecessary. (However, it is required that your Asprova NLS or Asprova DS is in an environment that can connect to our web server. )
What is an e-Protector?
This is a system to authenticate the Asprova NLS/DS license for machines without a USB protector socket or machines in a cloud.
< Why the annual renewal was necessary and explanation of how the problem was solved >
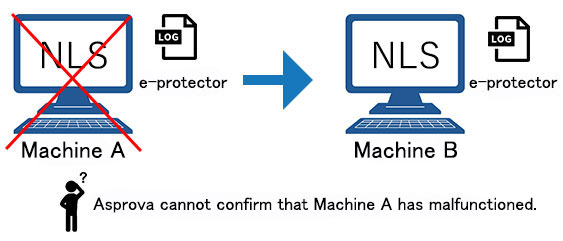
For convenience, the e-Protector has an expiration date. This is because if machine A with the e-Protector installed malfunctions and a new e-Protector is requested for machine B, Asprova has no way to check if machine A has really malfunctioned. Therefore, each e-Protector has an expiration date on an yearly basis.
From Ver.2.0.0.10, NLS will work with Asprova’s Web server and automatically update the expiration date of e-Protector. (NLS needs to be able to access the Asprova Web server via the Internet)
10. Maintenance contract service
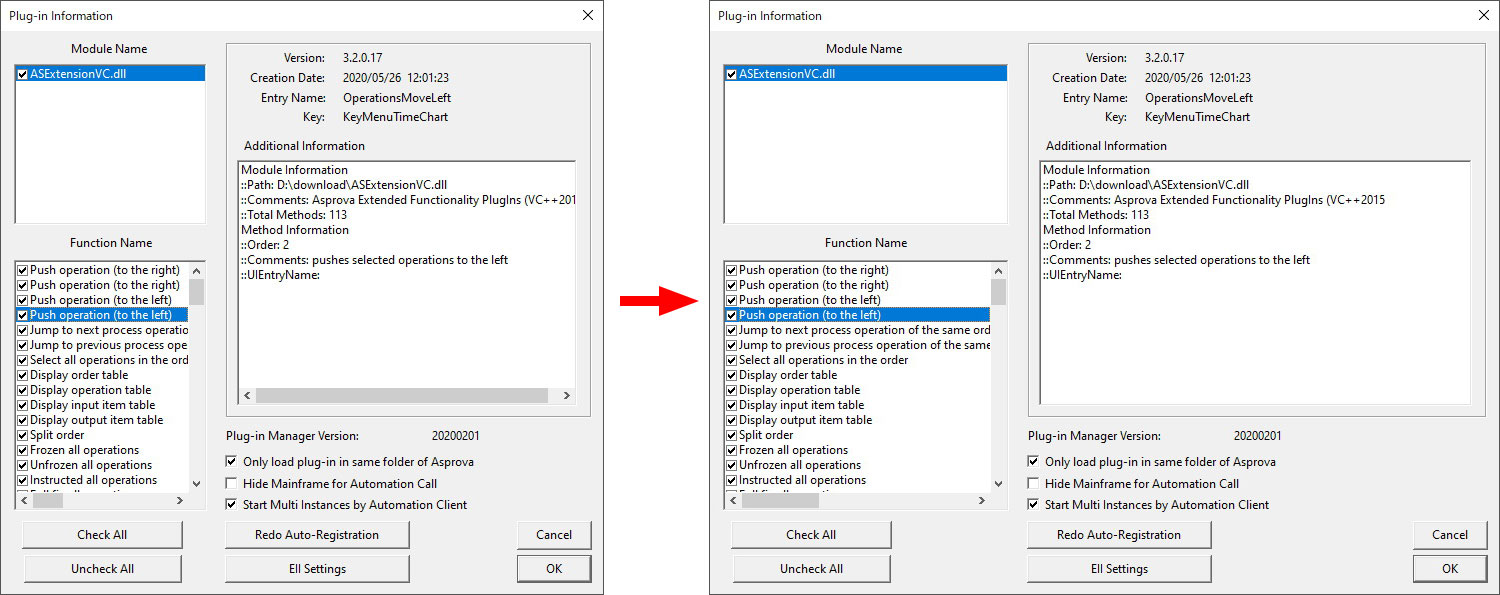
You can now exchange options for free.
You can exchange options up to once a year. MS Light options and MS options are not interchangeable. If you wish, please contact your distributor or our sales representative.
You can now download the magic number and license files.
The magic number and license files, which used to be distributed by mailing printouts or sending pdf files for purchasing new licenses and renewing maintenance contracts, can now be downloaded from the license download page
How to Use:
Log in to our homepage with the Asprova ID (former Web account) and password issued when you purchased the license. (The Asprova ID and password are printed on the “License List” printed with the magic number sent when renewing the maintenance contract or on the pdf.)
You can download the magic number of the purchased license, license file, etc.
From this version, you can download the magic number directly from Asprova and Asprova NLS/DS utilities, but even if you don’t use this version, this license download page will allow you to download information about the license you purchased at any time by logging in here.
Frequently asked questions:
Q1 Where can I find the Asprova ID and password associated with the license?
You can find it on the “License List” attached to the delivery note sent when you purchased or renewed your maintenance contract.
Q2 What has changed in the procedure for ordering a new license or maintenance contract?
It basically hasn’t changed. Mail of the delivery note, Magic No. and e-mail of the license files will be sent as before.
Q3 The license file is in .aslf format. Is the old format .txt supported?
No. The old format is unsupported. Therefore, Asprova NLS / DS can only be used by customers using Ver.2.0.0.2 or later.
Q4 Can I download past magic numbers?
Only the latest version can be downloaded for each serial number.
Q5 How can I associate multiple licenses with one Asprova ID?
That is not possible yet. We plan to release it in the near future.
11. Asprova ID
The name of the login account to our homepage has been changed to Asprova ID.